1/30/17

Dino Love with Joy Clair stamps

Hi everyone and welcome to a new month with Joy Clair stamps.  This month is all about embossing.

I've used the Dino Love stamp set today embossing hearts on the pink panel and also embossing the dinosaurs before coloring them.


These dinos are so sweet and so are the sentiments that accompany them.  I die cut "dino love", inked the edges of the oval and added it just below them.  Sweet don't you think?


Please stop by the Joy Clair blog for complete details.

Thanks for stopping by today.

Steph


1/27/17

Precious Memories Canvas

Hi everyone, I've got a new project on the Paverpol blog today using Pavercotton with Paverpol.

I love creating 3 dimensional backgrounds and Pavercotton dipped in Paverpol worked really well.  I just allowed it to dry then spritzed on assorted colors of Tattered Angels Glimmer Mists.


What do you think?  Please stop by the blog for step out details.
 
Thanks for stopping by today.
 
Steph
 

1/25/17

Collaged Heart

Hi everyone, I've got a new post on the Just For Fun Rubber Stamps blog using the fabulous Collage Heart.


This is a fun heart stamp that can stamped on a variety of colors of cardstock, then reassembled for a true collage look.
 
Please stop by the blog for more details.
 
Thanks for stopping by today.
 
Steph
 

1/23/17

Valentine's Day Coasters

Hi everyone.   Are you creating Valentine's Day projects yet?  It's almost time and these coasters were fun to etch and then stamp.


It's very difficult to stamp on glass, but use etchall® first and your stamping turns out beautifully.  Etchall is a reusable glass etching crème that can be used for so many projects.

First, fill a bowl with etchall® dip 'n etch liquid and place a coaster in the bowl.

 
After approximately 15 minutes remove the coaster.  Rinse and dry off.  Repeat the process for the second coaster.  Since etchall is reusable, pour it back in the container to use for other projects.
 
 
Using a Joy Clair stamp with Clearsnap chalk ink, stamp happy valentine's day in the center of the coaster and pour on clear embossing powder.  Heat set.

 
Next, stamp mini hearts around the edges and heat set.


On the 2nd coaster, stamp the double hearts with red ink and the words with black.  Add embossing powder and heat set.  Stamp and heat set words in the corners.


These coasters not only look pretty, they are also practical.


I'm thinking about creating coasters for each season and some to give away.
 
So what do you think?
 
Thanks for stopping by.
 
Steph


1/20/17

Mixed Media Heart Canvas

Hi everyone, here's my newest post on the Proxxon blog - a mixed media canvas.

I love creating texture so I first started by applying tissue paper to the background.  Once dry, I spritzed on assorted Tattered Angels Glimmer Mists.


Please stop by the Proxxon blog for the details.
 
Thanks for stopping by today.
 
Steph
 

1/19/17

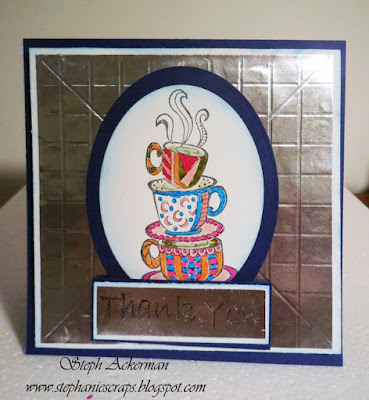
Thank You with Rinea Foils

Hi everyone, it's a new year and time to create with new products.  Have you had a chance to see Rinea Foils from Global Crafting?  If you are at CHA this weekend, be sure to stop by their booth to say hi.

 
Rinea Foils embosses beautifully.  I cut the foil into a 5" square, then using my Scor-Pal, I scored every 1/4".  I rotated the foil and then scored again every 1/4".  Then I angled the panel and scored from edge to edge.

 
I matted the scored panel with white cardstock and added it to the card.  Using the stacked cups from Just For Fun Rubber Stamps, I colored them with Tombow Markers then die cut the image.  After matting with cardstock, I adhered the panel to the card.  I then stamped Thank You on a scrap of silver foil with black ink, then embossed with clear embossing powder.  The foil embossed beautifully.

 
Be sure to stop by the Rinea blog to see some amazing projects with Rinea Foils.
 
Thanks for stopping by today.
 
Steph
 

1/17/17

Lovely Card with Makin's Clay

Hi everyone, with Valentine's Day coming up soon, it's time to create "Love"ly projects.


Nothing screams Valentine's Day like hearts.  Using Spellbinders dies, I die cut a heart from white cardstock and inked it with Crafter's Ink.  Usually I die cut wet clay, but today I die cut red Makin's® Clay which I had in my stash.  The hearts were die cut and embossed with Spellbinders dies.  I rolled out white Makin's Clay and cut letters to spell love using Makin's Clay Alphabet Cutters set.


I used Graphic 45 pattern paper for the card and matted it with green cardstock.  Next, I tied ribbon around the panel before adhering it to the card.  Twine was tied to the ribbon. 


LOVE was adhered to the card with Beacon Adhesives.

Thanks for stopping by today.

Steph

1/13/17

Happy New Year Decorations

Well, Christmas has come and gone and so has New Year's.  It's 2017 already and I wanted to show you a New Year's project I created with Paverpol, Rinea Foils, Spellbinders, Tattered Angels glimmer mists. 

 
Please stop by the Paverpol blog for details.
 
Thanks for stopping by today.
 
Steph
 

1/12/17

Let's make a Joyful Noise with Joy Clair stamps

Hi everyone and welcome to a new month with Joy Clair stamps.  This month is all about embossing.

It's time to make a Joyful Noise with the newest stamps from Joy Clair.


Please stop by the Joy Clair blog to see how I created my card.

Thanks for stopping by today.

Steph

1/11/17

Let's Wander with Just For Fun Rubber Stamps

Hi everyone, my newest post on the Just For Fun Rubber Stamps blog.  I wanted to focus on the wander sentiment so I paired it with pattern papers.


Please stop by the blog for details.
 
Thanks for stopping by today.
 
Steph
 

Valentine's Day sign

Hi everyone.  Christmas and New Year's have come and gone.  What's next on the calendar?  Why it's the month of Love and Valentine's Day.  Check out my newest post on the Bowdabra Blog.


A bow makes everything better don't you think?

Thanks for stopping by today.

Steph

1/10/17

Sending you a note

Hi everyone, I'm just sending you a note today with a sweet and simple card.


I created a feather using Makin's white clay and a ceramic feather for a mold.  Look at all the details!


I painted the feather with yellow paint to coordinate with the card I created, then added some brown ink to age it a bit.  Using Beacon Adhesives, I adhered the feather to a tag, then stamped a So Suzy sentiment beneath. 


So tell me, do you still send hand written notes to family and friends or is everything electronic?

Thanks for stopping by today.

Steph


1/9/17

Joy Clair January Blog Hop


JC Blog Hop

Happy New Year.   I am thrilled to be working with Joy Clair for another terms.  It's new release day at Joy Clair and the new stamps are amazing once again!!  Today I am using the Treasures set.   I love the sentiment so I used that as the inspiration for my card.


I created a 5 1/2" square gate fold card from black cardstock.  On the front panel, I stamped an assortment of jewels in black ink and embossed them with clear embossing powder.  After inking the panels, I matted them with red cardstock and added them to striped cardstock before adding them to the card.


I stamped the sentiment on white cardstock in black ink and embossed with clear embossing powder.  After die cutting the heart, I inked it with red ink, then added to a scalloped heart.  I adhered the left side of the heart to the left panel creating a closure.


Inside, I stamped additional elements on white cardstock.  I inked the panel then matted it with red cardstock.  I also used striped paper for the base to coordinate with the front panels.

Hop with us. Be sure to visit each of the designers on this blog hop!

Steph Ackerman  - YOU ARE HERE


Thanks for stopping by today.

Steph

1/8/17

Making bracelets and party favors with Whisker Graphics Twine

Hi everyone, I'm on the Whisker Graphics blog with some fun and easy to make bracelets and party favors.
 
I love the beautiful colors and the substantial feel to this twine.  This month I've created some bracelets that you can easily recreate with the kids.  Or maybe you can make up a bunch and put them in Middy Bitty Bags for fun party favors.  Who doesn't love giving a little "something" to party guests.  And the girls will love making them and giving them!


Supplies:
Middy Bitty Bags - Green and Blue Chevron
Divine Twine Collection - Bright White Solid
Divine Twine Metallics - Rose Gold Metallic
Divine Twine Bamboo - Aqua and White
Large Colored Tags - Yellow, Peach
JoyClair Stamps -  Butterfly Kisses
Clearsnap Ink - Black
EKSuccess Punches
Beads


Bracelets are fun to make and Whisker Graphics twine is the perfect starting point.  Cut 3 strips about 12" long and tie them together, about 1" from one end.   Tape the twine to the table because it's so much easier to work on the bracelet if it's stationery.


Braid down about an 1", then start adding beads to the center strand.

 
Braid between the beads to add some definition and keep the beads separated.  Once you've added 7-8 beads, braid the twine another inch then tie the twine together to finish.

 
Use an assortment of twines to create some really fun bracelets.  The twines add amazing visual interest and texture.


Wear them all together or separate - it's up to you.


For the party favors, I folded down the top edges of the bags, then tied them closed with white twine.
 
 
Finally I stamped the tags with Joy Clair stamps and used the same twine to tie them to the bags. 


Just think how much fun you'll have making these with the girls.  Just put out the twine and beads and let them decide what they want to make (and how many!!!!).
 
Thanks for stopping by today.
 
Steph


1/7/17

Without Fear Sign with Proxxon Tools

It's 2017 and time for some new Proxxon projects.

Today I've created an inspirational sign on the Proxxon blog.


Please stop by the Proxxon blog for the full details.

Thanks for stopping by today.

Steph


1/6/17

Snowman Canvas with Rinea Foils

Hi everyone, I'm on the Rinea blog today using Rinea Foils in a variety of ways. 

 
Using a canvas panel, I spritzed it with an assortment of Tattered Angels Glimmer Mists.  Once dry, I stamped an assortment of snowflakes from Joy Clair Stamps about the panel.


Next, I used my Cricut Expression to die cut a snowman from Glossy Silver Foil and it cut the foil beautifully.  I die cut a snowman from black cardstock to use as the base, then adhered the silver foil pieces on top.  To finish I also die cut a blue hat and scarf.


Using a border punch, I punched 2 layers of "snow drips" from 2 colors of Embossed Blue and Embossed Light Blue Foils.  After adhering the Blue Foil to the canvas, I used foam adhesives to adhere the Light Blue Foil on top.  The foil cut easily with the intricate punch!  To finish I punched two holes in the top and added twine for the hanger.


For me details, please stop by the Rinea blog.
 
Thanks for stopping by today.

Steph

1/4/17

Bottles of Hope with Makins® Clay

Hi everyone, I've got a new post on the Makin's Clay blog

This month I've created some Bottles of Hope to share. 


From the Makin's website:
Bottles of Hope are small glass bottles covered with polymer clay and given to cancer patients. They symbolize a wish and a hope for health.  This project was started in 1999 by a Rhode Island cancer survivor and has spread internationally. Bottles are made by artists, students, survivors, seniors and many more who volunteer their time and love.   Learn more about this worthwhile project, see a gallery of many creative bottles and more here on their website
 
Supplies:
Makin's® Clay - Earth Tones, Yellow, White, Green, Red
Makin's Professional® Cutting Mat
Makin's Clay® Roller and Cutters set
Makin's Clay® Clay Tool set
Makin's Clay® Clay Cutters - Stars, Suns, Butterflies
Makin's Clay®Texture Sheets - Set H
Beacon Adhesives - 3-in-1 Adhesive
Sizzix Dies
Tattered Angels Glimmer Mists


I found these cute little light bulb bottles and knew they'd be perfect for the Bottles of Hope.  After wrapping with white clay and allowing to dry 48 hours, I spritzed color with Tattered Angels Glimmer Mists. 


Cut enough suns from yellow clay and enough stars from green clay to wrap around the bottles and adhere them with Beacon Adhesive. 


Add butterflies randomly about the bottles.


What will you create for this worthy cause?

For complete details please stop by the Makin's blog.

Thanks for stopping by today.

Steph


1/2/17

Decorative Watering Can

Hi everyone.  It may be cold outside, but I'm thinking of Spring - the flowers, the warmer weather, the spring showers.  I've got a Spring post on the Bowdabra blog.

 
Stop by the Bowdabra blog to see how I've created a two ribbon bow for my watering can.
 
Thanks for stopping by today.
 
Steph
 

1/1/17

Season's Greetings Nutcracker

Happy New Year everyone.  It's a new challenge at Just For Fun Rubber Stamps so I've created a Season's Greetings Nutcracker card.


The Stamptangle Nutcracker was stamped on white cardstock, then colored with Tombow Markers.  After inking the edges of the panel, it was matted with black cardstock before being adhered to a kraft card. 


Season's Greetings was die cut from some left over holiday paper.

Please stop by the JFF blog to see what the designers have been creating.

Thanks for stopping by today. 

Steph